Cupcake, Sweet

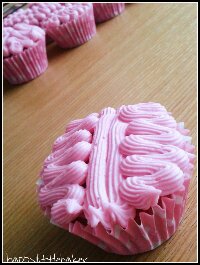
Halloween Strawberry Brain Cupcakes

I had really intended to post this on Halloween but as usual the time has completely ran away from me and before I realised it is over a week into November. 

It might be a bit late but I was really happy with the way these came out and they were so easy to do that I wanted to share the recipe so that everyone can make them.

No one can say that baking doesn’t make you clever, after making these you’ll feel very brainy! Hehe.


Strawberry Brain Cupcakes

This recipe will make 12 average size cupcakes or 9 larger muffin ones (larger will need longer cooking).
image

4oz Sugar
2oz Margarine
2oz Butter
4.5oz Self Raising Flour
2 eggs
1-2tbls Whole Milk
1-2tsp Strawberry Essence
Red or Pink Gel food colouring (if using liquid colour then do not add the milk) I used claret gel colour.

Pink buttercream:
2 – 3 large tablespoons of butter or margarine
Icing sugar
Red or pink food colouring

Pre-heat oven to 180c Gas 4

In a bowl cream the butter, sugar and margarine till it becomes pale.
Mix in the food colouring till completely combined.
Add one egg and half of the flour, try not to overwork this.
Add the second egg and rest of the flour.
Stir in the milk (if using gel colour) and the strawberry essence.

You should now have a lovely very vibrant colour. The colour should be brighter than you think it needs to be as it will lose some colour once baked.

Divide the mixture into your cake cases and bake in the oven till the tops of the cake spring back after a gentle poke. This should take 18-20 minutes.

Once cooked, cool on a wire rack.

Whilst the cakes are cooling make the buttercream.
The best way to make the buttercream is by taste. Add 2-3 large tablespoons of butter or margarine in a bowl and stir in 3-5 tablespoons of icing sugar and a enough food colouring to give it a very bright pink colour. If you think it needs a little more icing sugar then add more to taste. You’ll be surprised how much icing sugar you can add to a buttercream.

Once the cakes have cooled fully, fill a piping bag with a small star nozzle.

To decorate – pipe 2 lines down the centre of the cake the either side pipe tight zigzags. This will give you a lovely brain look!

Experiment with colours and zombie brains, I’d love to see any pictures if you make some.

Chocolates/Truffles, Sweet

White chocolate and Strawberry truffles

My second foray into chocolate making has appeared to have been quite successful. This time I wanted to make some truffles for my sister using a couple of her favourite flavours – white chocolate and strawberry.

Unfortunately I have had to use everyone else’s response to the taste of the truffles to work out if they are nice or not as I don’t like the taste of strawberry! It is one of the few flavours (along with banana, liquorice and honey) that I really don’t like but strangely, I like actual strawberries.

The white chocolate is a lot harder to work with than dark chocolate as it is has lot slimier feeling when you are trying to roll them into balls and does melt a lot quicker but it does have it’s advantages to.

Firstly – you can colour the white chocolate into any colour you like using usual food colourings. For me, I always use gel colours and never the liquids because they completely change the consistency of what you are working with and are less vibrant. The gel colours only need a very small amount to make something look quite interesting.

Secondly – white chocolate doesn’t have too much of its own taste so you need to add less flavourings.

I wasn’t sure whether I had put too much of the strawberry essence in as it was far too sickly for me, but according to my sister it was just right.

I have to say that it is really nice making your own chocolates, especially when people look quite impressed, and the next step is to make the boxes to put them in so I can give them away as gifts so they look very pretty.

Luckily as I have a graphic designer for a husband and my cousin is very good at free hand drawing, I’m sure my labels will be better than my boxes!


White chocolate and Strawberry truffles

I made these into 18 truffles

150g (5.3oz) white chocolate
60g (2.2 oz) butter
3 tbls double cream
½ – 1 tsp strawberry flavouring
Little bit of red or pink gel food colouring – optional but I thought they looked pretty
Icing sugar to coat

In a bain marie (a bowl over boiling water making sure the water doesnt touch the bottom of the bowl) gently melt the chocolate, butter and double cream till it is all combined.  You can also do this in the microwave.

Take off the heat and stir in the stawberry flavouring and food colouring till it is all combined.  Don’t worry if it looks a little greasy at this stage.

Put it in the fridge for a couple of hours or overnight.  It will set quite hard and loose its greasy look when ready.

Take out of the fridge about an hour – 2 hours before you plan on rolling the truffles as this will give it time to soften up.  Using a teaspoon measure out a small amount and drop into the icing sugar on a plate.

Using the icing sugar to stop it sticking or melting, roll it into balls and put into small paper cases (I use petite four cases or tiny cupcake ones)

The truffles will keep in the fridge for up to a week… and if you have friends and family who enjoy them then they’ll last about 30 minutes.